Add a Logo or Image to your Gmail Signature
Have you been wanting to add your business logo or an image to appear at the bottom of every email automatically? Think of how many emails you send every day, many to customers and prospects. Adding your company logo to the signature is just one more little way to strengthen your brand and look professional. Every email client will be a slightly different process, so let’s look at how to do that in Gmail first. Here’s a video tutorial:
Here are the written instructions:
-
The logo or image you want to add to your signature must be available on a public web server (aka the Internet). This is the only tricky part. It is very likely that your company logo is already on the Internet on your website, Facebook account or Linked In account. If you have access to upload images to your blog or website, you can get your logo or image online that way. Or if you don’t have a web site, you can use a free image hosting service instead like Flicker.com or Snapfish.com. Either way, it doesn’t really matter where the image is coming from, just that it is available on the World Wide Web. Note: If the image is larger than approximately 200×200 pixels, consider shrinking it to more signature-friendly proportions before you upload it. The iCandy logo at the top of the page is 160px by 100px (px stands for pixels), for comparison.
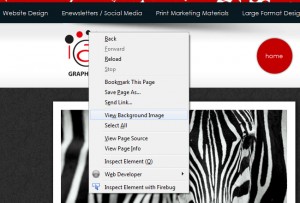
A. Once you have located or uploaded your logo or image to a web server and it is available on the Internet, right click on the image and select “View Image” or “View background image.”
B. This should take you to a screen that shows just the image you are trying to use. At the top of your internet browser will show the URL or path that you should highlight and “Copy.” You will be “Pasting” this later in your Gmail settings. -
Once you have the logo online and the path ready to go, click “Compose” mail in Gmail. Make sure the rich text editor is enabled. If you see “Rich formatting »” right above the message’s text composition area, click it. If you see “Plain text »” that means that the Rich Formatting is enabled already.
- Click “Discard“.
- Click the settings button that looks like a gear in your Gmail inbox’s toolbar. Now select Settings from the menu that appears.
- Make sure you are on the “General” tab.
- Look for the “Signature” entry area (and make sure the desired account is selected in the drop-down menu if you have more than one account).
-
Add any text to the signature area that you want to appear in every email, such as your name, phone, etc. and format. Note: If you can enter only plain text, see Step 1 before returning to your signature settings.
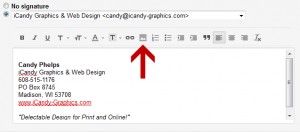
- Position the text cursor where you want the image to appear in your signature. Click Insert Image in the signature’s formatting toolbar. (If you cannot see the Insert Image button in the toolbar, make sure Inserting Images is enabled.)
-
Enter the desired image’s URI (on the web page, blog or image hosting service) under Image URL.
- Click OK and you’ve done it.
- Make sure to save your settings!


